Pillow talk

20131222-205305.jpg

We’re about to take our first road trip with Owen’s car seat facing forward, and I felt like he needed something special to mark the occasion. I give you: a celebratory pillowcase. Also known as something quick, easy and practical.

Mine is sized to fit a toddler pillow (about 13×17”). I used some green cotton fabric I had on hand and cut two squares an inch or so bigger than the above dimensions. Place the right sides together (so, the sides you want shown at the end), pin around the edges to keep them straight, and sew a straight stitch down both long sides and one short side. Turn right side out. Fold the open short side in an inch (or more, depending on how wide a hem you want) and sew another straight stitch around it to create a finished opening. I added a strip of red rickrack as an embellishment, but you could leave it as is, or add ribbon. I wanted to embroider his name above the rickrack, but my machine and I had a parting of the ways that evening. Maybe for 2014?

I also thought about adding a pocket to the backside, so he could add a small book or toy, but I think I’ll wait until he’s graduated to a full-size pillow to do that; this one’s too small for any sort of useful pocket.

That’s it. In 15 minutes you’ve just elevated a boring car ride to a special treat. (Or, at least given the car’s smallest occupants a few minutes of distraction.)

I’ll be back after the holidays. Merry Christmas and Happy New Year, y’all!

Christmas quiet book look-through

christmas quiet book with text

I finally finished one of my last big projects for 2013: a quiet book (also called a busy book) for Owen. I plan to make him several of these, but started with a Christmas theme because that’s what I had the most initial ideas for. I found lots of ideas online, some of which I used, others I came up with on my own. It will be great for keeping him entertained on cold housebound days, on upcoming holiday road trips, at dinners out, in church, etc.

A lot of my construction ideas came from Serving Pink Lemonade, including the book size. I used Pellon for the page backgrounds, adding colored felt (the thin, stiff kind) to some of them to break up the white. I simply sewed the colored felt and Pellon together, then added the page elements. I found a bulk amount of Pellon and then just used a rotary cutter to trim pieces to page size. I used regular felt, and a few other embellishments, for the page pieces.

christmas quiet book cover

I also followed her binding tutorial, using red felt instead of the flannel, and adding loose-leaf three-ring binder clips instead of ribbon. I felt like the clips gave the pages more freedom to turn (but without looking sloppy), and will make it easy if I ever need to swap out or repair a page. Not that I anticipate that happening or anything J. I constructed each page individually, then sewed pages back-to-back as the final step before binding them with the cover.

For all the templates, I used the same method of cutting felt I describe HERE when making Owen’s Halloween cape. It’s so much easier, faster and neater than freehanding or tracing. Unless I mention otherwise, I found templates doing a Google image search for free clipart. I also highly recommend using a fusible webbing (like Heat n’ Bond) to secure the page elements to the page before sewing. It keeps them in place without using pins and makes it a breeze to sew on.

christmas quiet book tree page

I tried to make the book appropriate for a wide age range, from infant to elementary-age. The first page is a Christmas tree texture page, inspired by the Lion page on Sunshine, Lollipops and Rainbows. I used scraps of green fabric for the tree, and strips of ribbon for the skirt. The tree pieces are all sewn on, but the ribbons are only sewed underneath the tree, so you can touch, pull and ruffle them. I added some liquid fray-check to the ends of both so it (hopefully) won’t fray over time. Last, I hot-glued some sparkly pipe cleaners on as tinsel and added a glitter star on top.

christmas quiet book present stockings page

The next two pages continue the holiday theme. On the left, there’s a Christmas gift you can tie a bow on. I cut out a red felt square and sewed a vertical piece of ribbon to the front. Then, I used double-sided fabric tape to attach a loose strip of ribbon horizontally across the back of the square, making sure it was long enough to tie into a bow on the front. Then, I sewed the whole square to the page. I added fray check to the ends of this ribbon, too.

christmas quiet book stocking page

On the right is a stocking guessing game. I used printable iron-on paper (left over from Halloween!) to print colored clipart images of basic toys – a book, a drum, a ball, blocks, and crayons, then ironed them to the page. Next, I crafted five stockings out of red and green felt, and sewed just the top trim of each stocking to the page, centered over the toy images, so you can flip them up and see what’s inside.

christmas quiet book snowman page

This two-page spread was inspired by Imagine Our Life. (My pieces aren’t as finished, though!) You can build a snowman and dress him two ways: for day (scarf/hat) or night (nightgown/cap). I used stiff white felt to make the hills and added another layer to the right page as a pocket for holding the parts. The snowflakes are pieces of white craft felt that I glittered and covered in clear varnish for longevity, then hot-glued to the page.

christmas quiet book hot chocolate cookie page

Next we have two of my favorite pages – a counting game and a color-matching game. The hot chocolate mugs each have a number card that corresponds to the number of marshmallows in the mug that slides in and out of the back of the mug. I attached it to the page with a ribbon so no card gets lost. The mugs are felt, and the marshmallows are mini white pom-poms that I glued on. I used THIS candy-cane font to print numbers on white cardstock, then laminated them for durability and hot-glued them to the ribbon. The cookies are felt with neon-colored puffy paint “sprinkles.” The reader can match the sprinkle color to the same-colored plate (a circle of felt sewn to the page). I added sticky Velcro circles to both pieces, just to make sure they stay in the book during transport.

christmas quiet book boot coat page

The next two pages were probably the hardest. On one, I envisioned “Santa’s boot” for a lacing and tying page. I found a black leather-like material scrap in the clearance fabric bin, and cutting it out wasn’t a problem, but finding appropriate-sized eyelets – and then successfully adding them to the boot without ripping it – was quite the task. I used THIS boot template from Real Purdy, and cut a piece of black stiff felt as the base. I used regular black shoelaces, and given the size of the boot, just made this another tying page instead of lacing. There wasn’t enough room to do both without tearing up the boot fabric, which actually included a puffy batting layer underneath. The shoelaces were way long, but I cut a chunk from the middle of one lace, then sewed those two pieces together to make it a better length. Then, I sewed the whole thing on top of the black felt piece.

I had the hardest time finding a coat template – I ended up finding a picture of another quiet book’s coat page, and using that image as a template. I cut out a slightly smaller version in peach-colored felt as a body, and sewed a small red heart to the chest, then sewed that piece to the page. I made a fantastic discovery in this process that my sewing machine has a special foot for doing automatic buttonholes – BRILLIANT. So, I made three buttonholes on one side of the coat, and then sewed three buttons on the other side – something my machine, as it turns out, also does automatically. Shut. Up. (It’s the Singer Futura CE-250 Embroidery Sewing Machine, and I highly recommend it. It gets a little happy with the error messages, but since I’m such a beginner, most of the time I am, in fact, doing something wrong.) I sewed the arms and sides of the coat to the page (leaving the collar/bottom open for buttoning ease).

christmas quiet book pie mitten page

The last spread is my second-favorite, inspired by THIS pie page at Bubbles and Bobbins. On one side is a weaving game with a pumpkin pie: a circle of orange gingham fabric, sewn to the page, topped with a tan felt “crust” that’s also sewed on. For the top pieces, I used a scalloped rotary cutter to make six same-sized tan felt strips, then laid them on top of the pie and trimmed at an angle accordingly so they would fit into the circle nicely. I sewed a straight line across the top three strips and along the side three strips, so you can flip them up and weave the crust together.

christmas quiet book pie page

On the other side is a simple oven mitt – just a piece of green felt in a mitten shape, with some red rickrack I added at the bottom. I sewed the whole thing to the page except for the bottom edge, so Owen can practice putting his hand in and out. I really wanted to use a fancy zig-zag stitch around the mitten, but my machine and I had a parting of the ways and I finally gave up and straight-stitched it. Maybe next time.

christmas quiet book reindeer page

The final page was inspired by THIS quiet book. I printed a reindeer clipart image on white cardstock, laminated him for durability, then used an Xacto knife to cut two small slits for threading a ribbon through. I hotglued a length of ¼” white satin ribbon at a diagonal to the back of the page, and added a white felt circle moon in the top right corner. I cut out three small houses from gray felt, and sewed each on to the bottom of the page. It’s a lot of fun to slide the reindeer up and down across the night sky.

This project wasn’t hard, just tedious. There are lots of moving parts and domino effects. I’m thinking a farm theme is next…any suggestions?

You say it’s your birthday: Toy Story party recap

main table 3

Go big or go home: that’s my party motto. And this year, we went big.

Little man turned two last month, and we celebrated with a family celebration that doubled as an official housewarming. It won’t be happening every year (all things in moderation, and all that), but I want to recognize milestone years, and we were three weeks post-move and in a temporary apartment for Owen’s first birthday in 2012. It’s also been several years since I’ve had a chance to host a big shindig — so I had a party inside me needing to get hosted.

I went with a Toy Story theme, since Owen is all about toys right now and LOVES his Woody doll and other characters. (Given that I’m pretty strict with screentime, it’s a bit ironic, but hey.) A few upfront tips:

  • Start planning early. As in, several months in advance. Take time to think about exactly what you want, and you’ll have time to find it (and find the best price) or make it yourself. I started thinking about his party in August, both to give myself plenty of time to get it together but also because I knew how busy our fall was – family visits and parties, work deadlines, Halloween, etc., were all going to need time on our calendar, too.
  • Brainstorm, brainstorm, then brainstorm some more. Free associate any and all ideas you have for your party, from venue to food to activities to logistics, keep notes, and then hunt out more inspiration from friends, magazines, websites, etc. I like to have a comprehensive list of anything that I could do, then narrow it down to what makes sense and know it’s the best of the best of my ideas. It prevents that “You know what we could have done?” moment, or the last-minute 11 p.m. Walmart panic trip.
  • Be realistic. Understand your strengths, then capitalize on them. Know your weaknesses, and outsource those tasks. Recognize your time constraints, stressors, and space problems and plan accordingly. What this looks like for me: I plan early and often, organize obsessively, hire someone who can bake, and nominate family to help in food prep.

I loved everything about this party, and it went beyond my initial expectations. A HUGE thank you to our family and friends who all drove in from afar to celebrate with us and make Owen’s day special (especially my best friend, Bethanie, who blogs at The Purple Path, and volunteered her picture-taking services). He talked about his “Woody Buzz party” for a long time leading up to it, and I know he’ll still be talking about it for months to come.

For all the details (and some free printables!), check out the party topics below.

FOOD

DECORATIONS

ACTIVITIES

Toy Story birthday party: The activities

potato head game 3

This is the third and final in a series of posts recapping my son’s Toy-Story-themed second birthday party. Go HERE for the initial post, or check out the details on the FOOD and DECORATIONS.

The activities were my favorite part of planning this party, and a Toy Story theme lent itself perfectly to it. I planned seven game stations, stationed throughout the house so people could be playing at the same time and then rotate through. I made simple signs using a crayon-like font, attaching a solid-colored cardstock sheet to the back to add some color. I also let Owen get involved with the party prep by adding Toy Story stickers to the signs.

(One last-minute idea I had, that I didn’t execute: since Toy Story is part of the Disney family, it would be cute to create Disneyworld ride passes or tickets that guests have to get stamped or stickered as they play each station. The first person with all stations stamped, or with a certain number of stamps, gets a prize – like going through the buffet line first.)

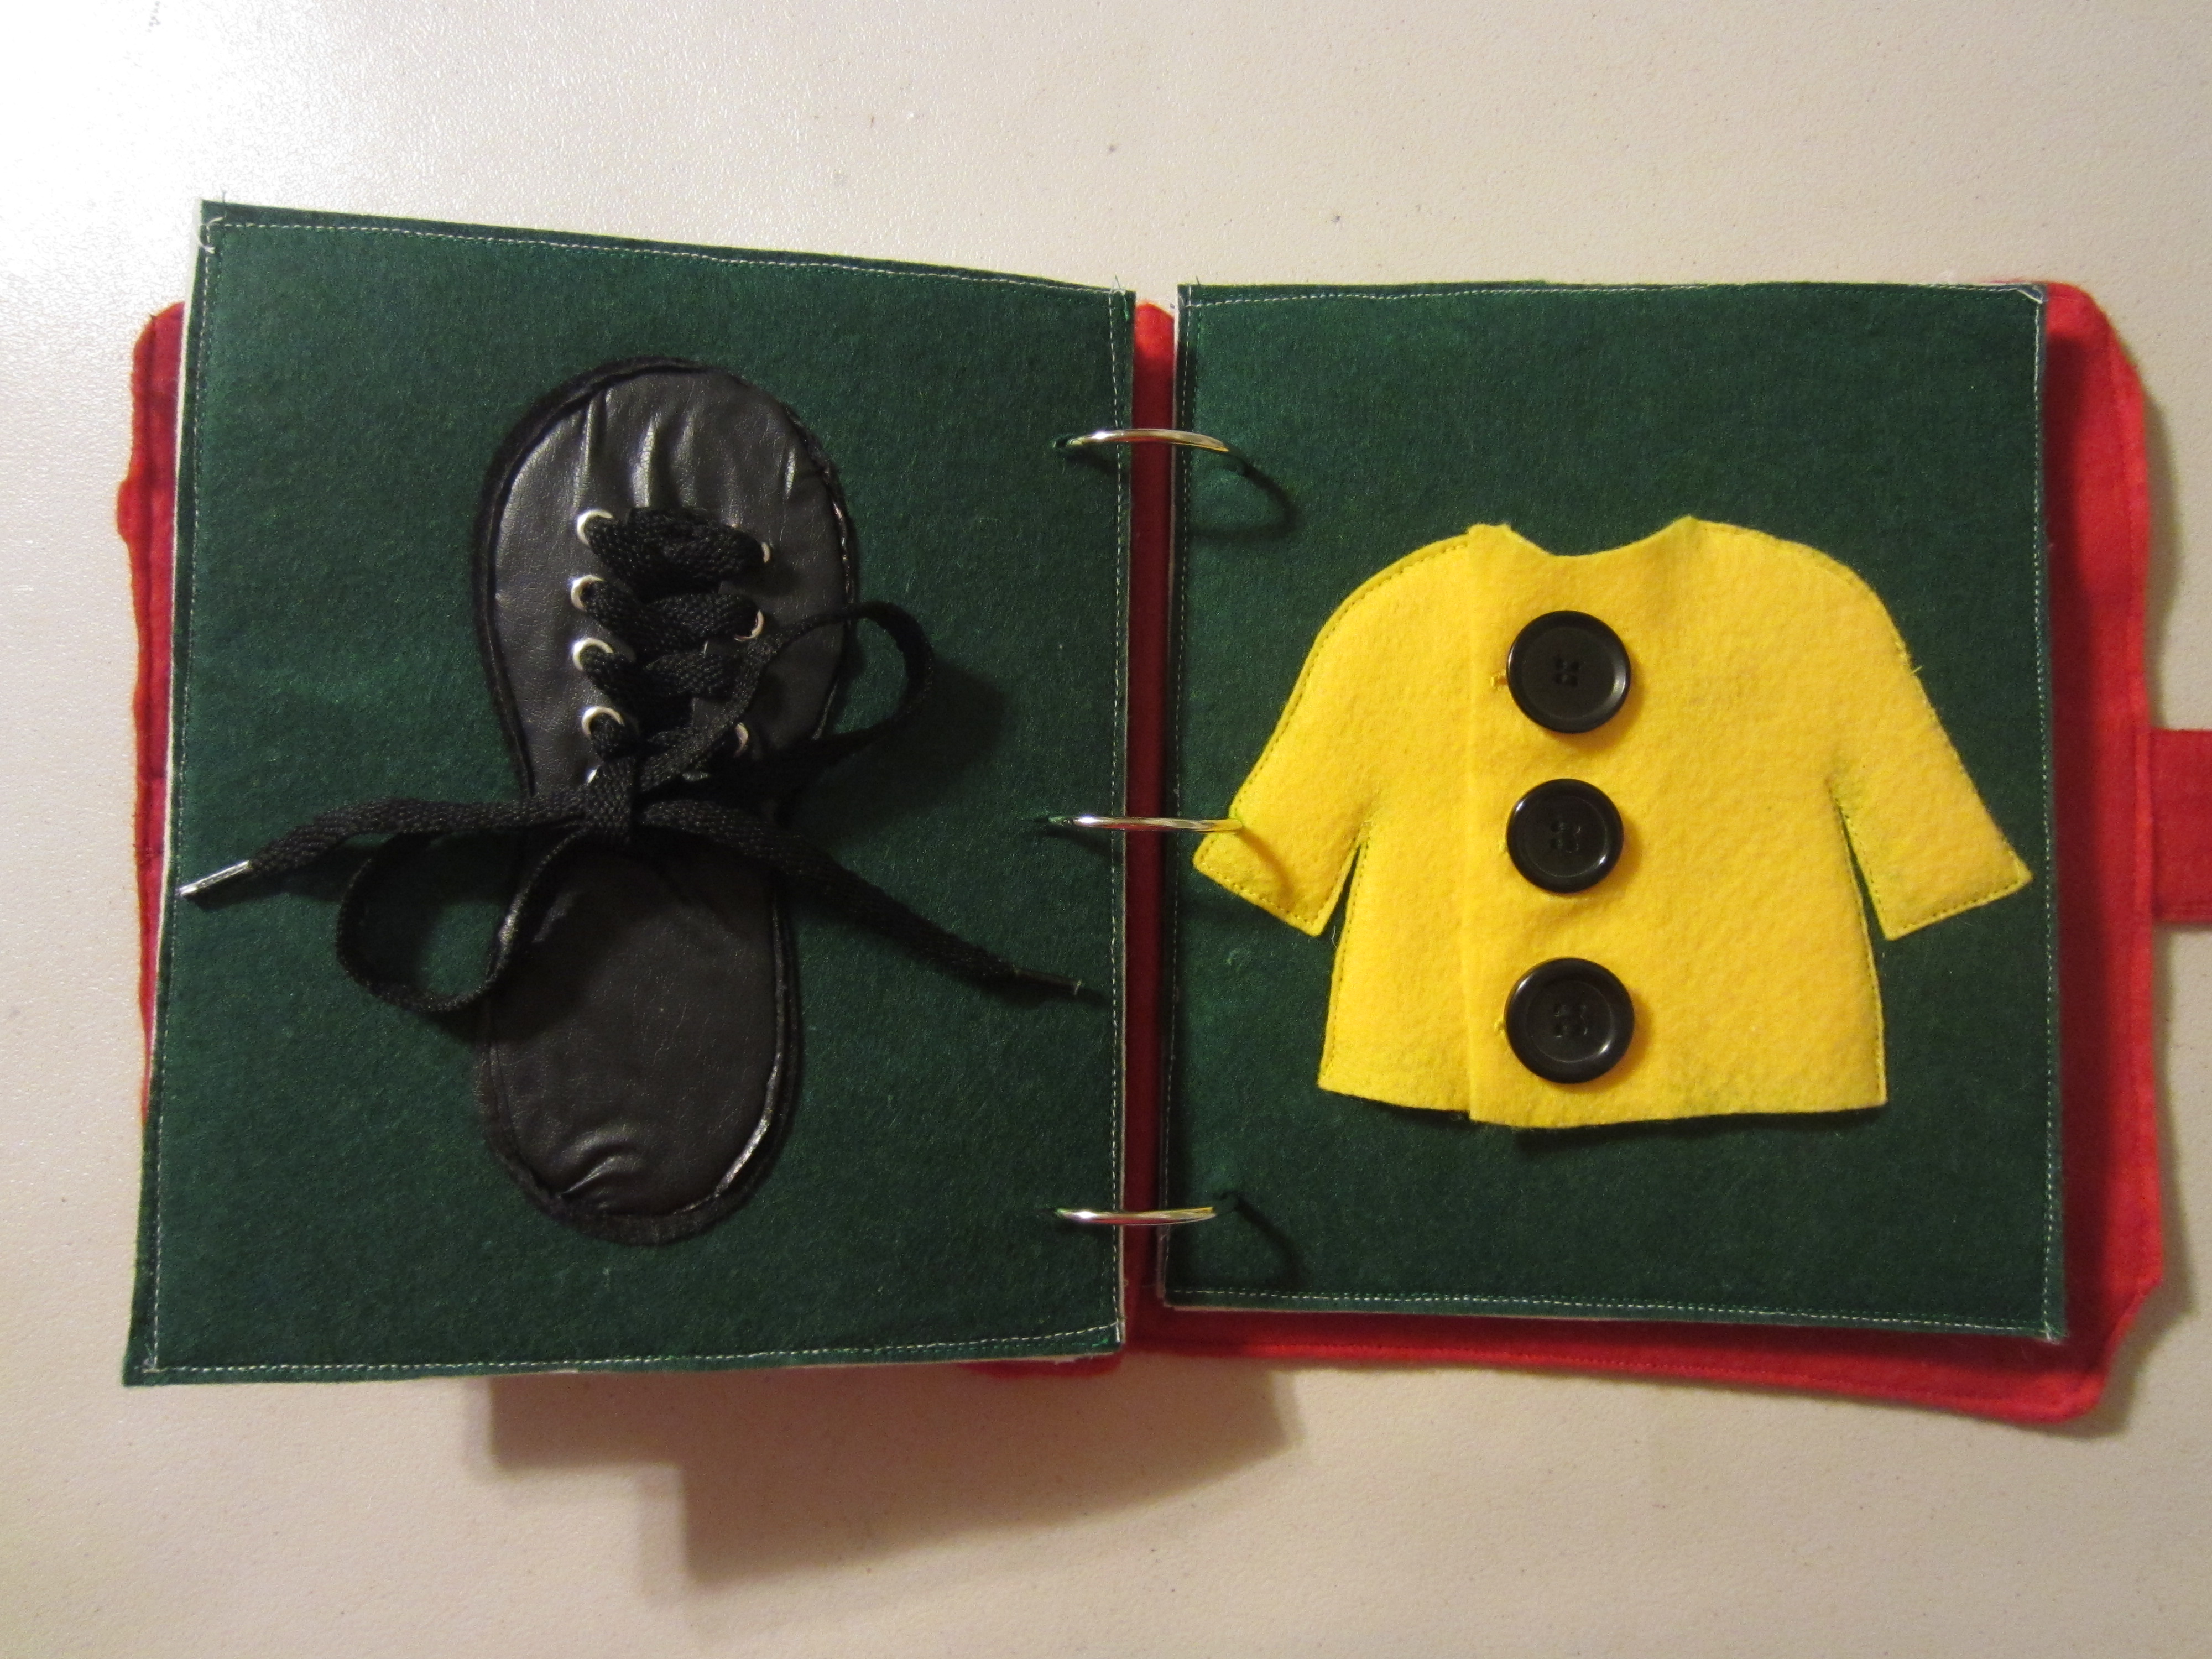
Pin-the-Part on Mr. Potato Head

potato head game

This was really simple, and like most of these activities, Owen was able to play with and enjoy it long after the party. I bought a yard of blue and a 1/2 yard of tan felt at JoAnn’s (found in the fabric section – I actually found the tan felt in the clearance remnants section!), and grabbed several colored sheets (white, black, red, pink) of felt from the craft aisle.

I used the potato head templates HERE, enlarging them as needed, then printing them onto freezer paper for easy cutting (for details, see THIS post on how I made Owen’s Halloween cape). I sewed the potato head body to the center of the blue felt, then cut out the accessory pieces. I didn’t sew a border around the accessory pieces, or add any details to them like shoelaces, but you certainly could. I added grommets to the top and hung it using small clear Command hooks.

To play: blindfold your participant, spin them a couple of times, then hand them the potato head accessories and let them try to put them in the right place. Felt sticks to felt, so as long as you pat them down, they’ll stick until you move them again.

Bullseye’s Horse Race

horse race 9

Simple and fun. I bought two inflatable stick horses from Oriental Trading, and used plain crepe paper streamers — which I had in my stash from a previous party — to make a finish line. You could include some cowboy hats, too, or get some brown yarn and add “reins.”

To play: first one to break the streamer wins! Horse sounds optional. Alternative ideas: set specific challenges, like riding backwards, riding while counting or singing the alphabet, riding while moving your feet heel-to-toe, etc.

Buzz’s Galaxy Bowling

bowling

I bought a cheap plastic bowling set from Amazon.com and added glitter star stickers, found on clearance at Hobby Lobby, to the balls and pins. I also got glow-in-the-dark bracelets to put over the pins’ necks, but forgot to get them out!

To make the bowling lane, I used a long sheet of cardboard I had at the house (it came when we had to order new window screens, bonus) and covered it with white, then neon purple, then neon green, duct tape (found at Walmart). I drew the triangle hash marks on one end with a purple Sharpie. It would be neat to play this in a darkened room with a blacklight or disco ball, if you have the space.

To play: follow regular bowling rules (each person gets two rolls, etc.).

Woody’s “There’s a Snake in My Boot” Throw

snake throw 2

This was probably Owen’s favorite. My husband gets all the credit, as I was prepared to just use a bucket with a picture of a boot glued to the front. He started with a small plastic bucket found in the Lowe’s paint aisle, and wrapped a piece of white poster board around it to form a tall tube, then used another piece of poster board to make a boot shape on one side. He covered the whole thing with kraft paper using clear packing tape. I was afraid to decorate it further, lest I ruin it with my subpar drawing ability, but you could also add a cactus outline and spurs (out of yellow cardstock or poster board), too.

To play: decide how far away participants can stand from the boot, and use painter’s tape or masking tape to mark the starting line. Hand them a bucket of rubber snakes and see how many they can successfully toss into the boot. Keep point totals, if you’d like, or play in teams, or best two out of three — or just play for fun. Must shout “There’s a snake in my boot!” at the end of each round.

Jessie’s Lasso Toss

lasso toss 2

My husband used a leftover piece of MDF and cut it to a 30×30” square, then used 1” dowel rods from Lowe’s, cut to size, and screwed into the bottom. He made the middle dowel a bit taller than the others.

I used paint pens in Jessie’s outfit colors (yellow, brown and red) and decorated around the rods, giving them different point values based on ease. We used twine found at JoAnn’s tied into a circle as the “lassos.” I wish we had started this a smidgen earlier and spent more time decorating it — I still felt like it was a bit plain. I’d also have liked to make the lassos more substantial, maybe braided, so they were easier to throw, but it was still a fun game. Owen was content to just carry the lassos around or use them while dancing.

To play: decide how far away participants can stand from the dowels, and use painter’s tape or masking tape to mark the starting line. Hand them the lassos and see how many they can get around the dowels, which are assigned different point values based on ease. Half points awarded for lassos that get stuck on top of the dowels. Must shout “Yee-haw” with each successful throw.

Rex’s Dinosaur Stomp

dino stomp 2

This was super cute — it plays like a cake walk. I freehanded 10 dinosaur footprints and cut them out of scrapbook paper in different shades of green, then used a number template I made using my Silhouette to color in numbers with a large permanent marker. I attached them in a circle to the floor using painter’s tape, and downloaded songs from the three Toy Story films to make a playlist on my iPod. Songs included:

dino stomp 6

“You’ve Got a Friend in Me,” various versions

“Strange Things” by Randy Newman

“I Will Go Sailing No More” by Randy Newman

“When She Loved Me” by Sarah McLachlan

“We Belong Together” by Randy Newman

“Hoy Un Amigo En Mi” by Gipsy Kings

I forgot to make corresponding number cards for the moderator to choose from, so we just had the person serving as moderator close their eyes while people were walking and then choose a number when someone else stopped the music. But cards would have been easier.

To play: Have participants choose a footprint to stand on. When you start the music, players walk from footprint to footprint in the circle; when you stop the music, players halt on the footprint they’re closest to, and the moderator draws a number between 1 and 10. The player standing on, or closest to, the drawn number wins a prize. If there’s a tie (say, the number drawn is five and there are players on four and six), the winner is the person who’s youngest. You could also use these same footprints and do hopscotch, instead, or even a version of Mother May I (take two dinosaur stomps, etc.).

Etch’s Coloring Station

etch coloring station

This was another of my favorites. I printed out an assortment of free Toy Story coloring pages found through a Google image search and set them up with a bucket of crayons for guests to color.

A tip: splurge for the real Crayolas; I bought the cheap big box of crayons, but they were super waxy, washed out and hard to color with. Crayolas would have made a difference.

I had this serve as the guest book, with each guest instructed to color and sign at least one page for the birthday boy, and leave a message on it. After the party, I added some pages Owen colored himself, along with a cover page and some pages of movie quotes that applied to little boys/birthdays/growing up, and had them laminated and spiral-bound at Kinko’s as a keepsake. (You could also scan them and create a photo book, instead, also adding images from the party.) This would be a great way to have a “virtual” party – just mail a page to each guest and have them return it to you.

Photo Booth

photo booth 2

Hands down, this was my favorite part of the party! I now feel the need to design photo booths for every. single. event. Really, really easy to execute and it was a blast. We set it up in the living room where there was plenty of room to move around and have an audience, along with two large picture windows for plenty of light.

I made the backdrop using THESE instructions for how I made the party logo backdrop.

For photo props, I printed out several movie quotes (“Yee-haw!” “To infinity, and beyond!” etc.) in word bubbles, along with some character accessories, like a cowboy hat, sheriff’s badge, pig’s snout and alien eyes, on white cardstock. I laminated them for stability and durability, and then hot-glued thin wooden dowels, cut to size, to the back side. (Here’s a printable version.) I also threw in some inflatable Buzz Lightyear wings that I found in the post-Halloween clearance, and a couple of Woody-style bandannas.

For the Etch a Sketch frame, I used a standard-sized piece of white foam board. I cut a square out of the center, using a ruler to get straight lines but freehanding how big it should be. I left a bit more room on the bottom to include the logo. I used spray adhesive to attach a sheet of red poster board on top, then cut out the middle again. I used two white water-bottle caps, with the tops painted white to disguise the letters, as the Etch a Sketch handles – I attached them with craft glue. For the logo, I printed out the Etch a Sketch logo (found using Google image search) and then traced over it with a ballpoint pen onto the red posterboard. Since I used foam board, the tracing left enough of an indentation that I could easily fill in the lettering accordingly. I used a brown Sharpie to do the background shadows, and a gold paint pen for the actual letters.

photo booth collage

To take the pictures, I set up my camera on its tripod, and let people either have someone else take the picture or use my camera remote to do it themselves. It was easily the biggest hit of the party and we got some awesome shots.

Slideshow

I created a photo and video slideshow in iMovie of Owen’s past year. (It ran about 40 minutes! We had a busy year. I also planned for it to loop throughout the party, but a lot of people (read: grandparents) did sit down and watch it once through. Bless them.) It was a lot of fun and I love having it, and plan to do it each year from now on, party or not. It’s also a great gift to give to grandparents and others – just burn more copies. The soundtrack included:

“Sweet Pea” by Amos Lee

“Beautiful Boy” by Ben Harper

“You Are the Best Thing” by Ray LaMontagne

“You Are My Sunshine” by Ray Charles

“If I Didn’t Have You” by Randy Newman

“Here Comes the Sun” by Landon Austin

“God Only Knows” by Natalie Maines

“Smile (Acoustic Version)” by Uncle Kracker

“Forever Young” by Bob Dylan

“Say Hey (I Love You)” by Michael Franti

Favors

favors

I’m a big fan of both thanking your guests for taking the time, and making the effort, to attend your celebration, but I also think it’s important to give them something they’ll actually like and use as a favor. It’s the thought that counts, but I’ll be thinking about your event a lot longer if I’m still using my parting gift.

Since all (that’s right: ALL) of our party guests traveled from out of town, I purchased a set of travel mugs from Shindigz.com with the event name and date. I made a sign (using THESE digital scrapbooking papers from Delightful Digitals on Etsy) that played off a line in the first Toy Story: “We are eternally grateful you traveled to celebrate with us today.” I put it in an Ikea Tolsby frame and added an alien figurine next to the cup display for guests to take on their way out. It was a hit, with several guests using the cups to hold water or coffee as they hit the road.

I also feel strongly about teaching Owen not only the importance of giving back, but how that is actually played out in everyday situations, and how it can take many different forms – but still have an impact. Since his birthday is shortly before the holiday season, and the party theme was toy-based, I made a contribution to our local Toys for Tots branch in honor of our guests. (You can donate easily online HERE.) I created a quick card alerting guests to the donation and put them inside each travel mug. I used printable business cards, since I had some in my stash, but you could print these on cardstock and cut out yourself for the same effect.

Whew! Planning a party this involved could have been stressful, but it truly wasn’t. I spaced out my planning over several months, spent a lot of time brainstorming so I felt confident with my choices, and tried to be as flexible as possible on “game day.”

Everyone enjoyed themselves, and the birthday boy felt loved. Everything else is just icing on the (birthday) cake.

Toy Story birthday party: The decorations

centerpieces 7

This is the second post in a series recapping my son’s Toy-Story-themed second birthday party. Go HERE for the initial post, or check out the details on the FOOD and ACTIVITIES.

I used the Toy Story logo and Andy’s room wallpaper as my color scheme (red, blue and yellow, with white and light blue accents). (Or, primary colors. Or, the same color scheme as a Snow White party. Which is why it pays to hang on to old party décor – you never know when it can be repurposed.)

Stationery

thank you

I ordered the invitations, return address labels and thank-you cards from THIS Etsy shop, Paper Monkey Company. They turned out beautifully, were super affordable and arrived quickly with no errors. I always recommend ordering a few extra than what you’ll think you need so you have them for scrapbooking, or in case the dog drools on one as you’re addressing them, etc. I wanted something that looked less commercial, so these fit the bill.

banner

I made a birthday banner, for above the gift table, to look like classic wooden blocks – I cut squares out of kraft paper, then used my Silhouette to cut out the square trim and letters from solid cardstock (the font is Cooper Black). I glued a long length of ribbon along the backside to join the blocks, and then folded a long piece of ribbon in half and attached it to the back of each end cap letter to make it easy to hang using small clear Command hooks.

Décor

wreath 2

Another quick project was this wreath – the best part is it’s all completely removable, so I could use the wreath again for something else. I started with a plain straw wreath form from Hobby Lobby, then wrapped wide yellow ribbon around it, starting and ending with a floral pick to secure it in place. I did the same thing with some thin blue ribbon, wrapping it in the empty space the yellow ribbon didn’t cover. I made a quick red ribbon bow (I have a Bowdabra – don’t judge), and stuck that on the side with a floral pick, then grabbed a mini Woody figurine and attached him inside the bow’s center with another pick. Last, I painted a wooden number 2 that I picked up at JoAnn Fabrics, then hot-glued a floral pick to the back of it to attach it to the wreath. So take all those picks out, and you once again have a plain straw wreath form. Ta-da!

main table 6

My favorite pieces, though, were the two “Andy’s wallpaper” backdrops I made, one for the photo booth (more on that HERE) and one for the main display. I bought twin-sized flat sheets from Walmart (I think they cost $7 each) and used my Silhouette to cut out the cloud shapes. Then, I glued the clouds to the sheet (which I had washed and ironed first) using craft glue (I like Aleene’s). Last, I added a row of grommets at the top for easy hanging with small, clear Command hooks. (Side note: You can spend $25 or more on a device that looks like a hole-punch to snap the grommets together, but I went for the cheaper option and bought only the grommets and had the husband hammer them together. It took all of five minutes. And now I kind of want to add grommets to everything.)

For the photo booth, I used the full length of the sheet, so that it stretched from the ceiling to the floor, but was still wide enough to fit 3-4 people in a photo, including the background.

For the main display backdrop, I measured from our ceiling to just past the table where the food would go, and cut the sheet to size, just to save myself from having the extra bulk to lug around or spend more time than I needed to gluing on clouds. You could also just mark where the sheet will stop being visible, and know not to add clouds past it. I also added an “Owen Turns 2” logo that I made using colored poster board and my Silhouette. I used clear packing tape (although duct tape or similar would be fine, too – it’s just what I had on hand), cut into strips and rolled end-to-end on the back of the logo, to attach the sign to the backdrop. It didn’t budge, even several days after the party ended.

centerpieces 9

For centerpieces, I bought 4” square cardboard boxes from eBay and used a black Sharpie to label them as seen in the Toy Story films: New House, Andy’s Room, Yard Sale, Attic, College, Sunnyside. Then, I added colored tissue paper and a few small Toy Story character figurines to each box, and lined them up on the tables on top of printed scrapbook paper (which I purchased from THIS Etsy shop, Delightful Digitals). I spent several weeks perusing eBay, toy stores and the like for miniature Toy Story figurines, and supplemented with some of our own small toys, too. In retrospect, I would have laminated those sheets and attached them all together into one big runner so they looked more “finished,” but the effect was still cute.

andy artwork

I added simple solid-covered plastic tablecloths, table skirts and balloons (using an at-home helium tank, and weights I had leftover from a previous party), and printed out THIS artwork to put up in the dining room. I used masking tape to stick them on the wall, but you could also string a ribbon banner and clip them up that way. How cute would they be interspersed with photos of the birthday boy/girl? I also made signs using a crayon-style font (HERE) announcing the different “stations” of the party, and attached them crosswise to solid-colored cardstock:

woody sign

Woody & Friends’ Saloon (food & drinks)

Pizza Planet Arcade (games)

Al’s Toy Barn (gifts & photo booth)

The Attic (quiet space, for anyone needing a break from the action)

The birthday boy got to wear some décor, too; I ordered THIS custom T-shirt on Etsy (Carlie Anna Boutique).

Nothing too extreme; but it’s the details that make it a party.

Toy Story birthday party: The food

Fotor1203125546

This is part one in a series of posts recapping my son’, Toy-Story-themed second birthday party. Go HERE for the initial post, or check out the details on the DECORATIONS and ACTIVITIES.

I wanted to host an early-evening heavy hors d’oeuvres party that would kick off shortly after Owen woke up from his nap, leaving enough time for people to enjoy dessert. (No one’s leaving this house without eating some cake.) (Bonus points for catching the Adventures in Babysitting reference.) (Best. Movie. EVER.) I matched the foods to Toy Story characters or places, and made food label tents using THESE digital scrapbooking papers from the Etsy shop, Delightful Digitals.

MENU:

Woody’s Trail Mix

Al’s Cheese Puffs

Hamm’s Mini Pinwheels (recipe HERE)

Sunnyside Fruits & Veggies (along with cheese & crackers; fruit dip recipe HERE)

Mr. Potato Head’s Spuds (chips & dip)

Slinky Dogs (pigs in a blanket)

Pizza Planet Pizza Bites

Buzz’s Space Balls (meatballs, recipe HERE)

Bullseye’s Watering Hole (beverages)

Fotor1203130216

I ordered the cake from a local bakery, using THIS picture from Salt Cake City as inspiration; I asked for buttercream instead of fondant, both for taste and price. If you’re in the Miami Valley, Ohio, area, I highly recommend The Cakery – they did a bang-up job on the cake, it tasted amazing (I went with the marble) and their customer service was easy and awesome. I ordered cutout sugar cookies locally from Just a Girl Bakes, and was beyond happy with them. She threw in a couple extras, hand-delivered them to my house the day before the party, and was quick to respond to questions (and they looked and tasted fantastic). We got lots of compliments on both!

water bottles 2

I ordered THESE water bottle labels from Etsy seller DigiPartyShoppe and was so happy with how they turned out – I had the digital file emailed to me in less than 24 hours, and had them printed, cut, and taped to the bottles (I used clear packing tape) all in under an hour. An easy and quick way to take your party a step above. (My only wish is that I had an easier time finding matching 2-liter bottles; I’m sure someone on Etsy could have done a custom request, but I didn’t go that far.)

Last, I created some cup labels using printable sticker paper and the digital scrapbook paper mentioned above, so guests could mark their cups. I also used them to label lemonade and tea pitchers. HERE is a similar template, with the backgrounds left blank for you to fill in. To add a picture: Click on the outer circle. From the tab menu, click Format > Fill > Fill effects > Fill > Picture or texture > From file: Choose picture > Ok.